In this part in our Boondocker’s Digest series, we’re learning more about your RV battery bank and the types of batteries that keep your appliances running when you’re RVing off-grid.
What is the RV Battery Bank?
When you park out in the boonies, your 12V battery bank, often referred to as your “house batteries,” keeps your RV appliances, lights and fans working. In addition, your house batteries can operate an inverter to provide AC power. It’s safe to say that your batteries are the heart of your RV’s ability to operate away from hookups.
A battery is an electrical storage device. Some batteries are designed to be single use, like the alkaline batteries in your flashlight or camera. When they are depleted, you throw them away. Rechargeable batteries are designed to be recharged when depleted. In essence, rechargeable batteries do not make electricity, they store it, just as a water tank stores water for future use. As chemical changes take place inside the battery, electrical energy is stored or released. In rechargeable batteries, this process can be repeated many times. Batteries are not 100-percent efficient—some energy is lost as heat and chemical reactions when charging and discharging. If you use 1000 watts from a battery, it might take 1200 watts or more to fully recharge it.
Three Types of RV Batteries: Lead Acid, AGM, and Lithium
There are three common house battery types used in RVs: Flooded Lead-acid, Absorbed Glass Mat (AGM) and lithium iron phosphate (LiFePo). RV house batteries must be deep-cycle batteries, which means they can tolerate repeated deep discharge/recharge cycles without damage. Deep cycle batteries are very different in design from a typical automotive starter battery, which is designed to provide a brief burst of high amperage to start an engine.
Deep cycle batteries are rated by their capacity, and this rating is often in amp-hours (Ah). It’s a simple concept: a 100 amp-hour battery should be able to run a one-amp load for 100 hours before it is completely depleted. Or it can run a 20 -amp load for five hours (20A X 5 Hr. = 100 Ah). Remember that, like a water storage tank, as you drain power from your battery, it will eventually become empty. So, to keep using it, you must recharge (refill) it.
It’s safe to say that most folks who boondock often want more battery capacity. The more capacity you have, the longer you can go between recharge cycles. If you want to power a lot of things from your house batteries, you need enough capacity to meet those demands for a reasonable period of time.
Your RV may have come from the factory with a single lead-acid house battery, or perhaps a bank of two or more. If you get serious about boondocking, you’ll probably want more (and better) batteries!
Battery Overview
Let’s talk about the different batteries available for RVs and choosing the best battery for your needs.
12V Flooded Lead-Acid
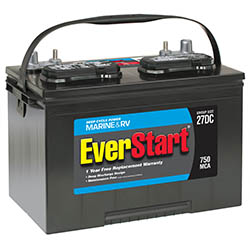
12V Flooded Lead-Acid batteries are generally the least expensive option. However, they require periodic maintenance, mainly checking the electrolyte levels and adding distilled water as needed. The most common sizes are Group 27 and Group 31. These batteries have a capacity of around 100 Ah each and weigh about 65 lbs. The typical lifespan with good maintenance is four to seven years. They generally sell for $100 to $125 each.
Flooded 6V Golf Cart Batteries
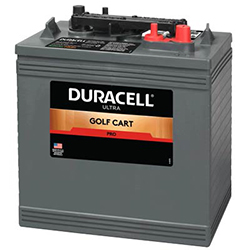
A popular upgrade is to switch to flooded 6V golf cart batteries. When utilized in pairs (wired in series to provide 12 volts), they offer a slightly higher Ah capacity and last five to eight years. In addition, they are built with heavier plates and a larger electrolyte reservoir. This helps them tolerate vibration and deep discharges better than their 12V cousins. Each battery cost $125 to $150 and weigh 65 to 75 lbs.
AGM Batteries
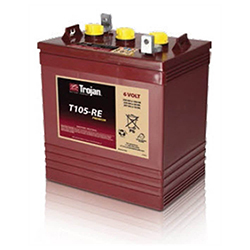
AGM batteries are sealed, no-maintenance lead-acid batteries. Their capacity is similar to the flooded types, and their weight is similar also. While you can get them in 6V versions, the most common ones are 12V. They do boast a slightly longer lifespan, up to 10 years, and have the advantage of being completely sealed. That means you can mount them anywhere, and in any orientation. They cost about twice what a flooded cell battery, approximately $300 each.
LiFePo4 Deep Cycle Batteries
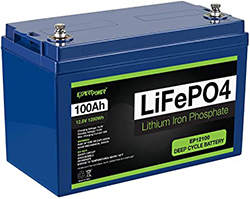
LiFePo4 deep cycle batteries are a fairly new option for RVers. They are superior in just about every way when compared to lead-acid batteries. A 100 Ah LiFePo battery weighs less than half what a lead-acid battery does and is completely sealed and maintenance-free. They also charge faster and are reputed to last up to 20 years. That duration is a bit questionable because they haven’t been in RV use long enough to establish their lifespan, but time will tell.
Another advantage to lithium batteries is their ability to tolerate a deeper discharge. Lead-acid batteries should not be discharged deeper than 40 percent. In other words, a 100 Ah battery has a usable capacity of 60 Ah. Discharging a lead-acid battery further tends to shorten its lifespan. On the other hand, Lithium can tolerate deep discharges to around 10 percent without damage so that you can utilize more of the battery’s rated capacity. The main downside is cost: A 100 Ah lithium battery will set you back $800 to $1000 each. Yes, the price continues to drop, but they are still quite costly compared to the other options.
So, Which Battery Should You Buy?
I think that if money is truly not an obstacle, then lithium is the best choice! They are a superior battery. However, if you are on a budget or are unwilling to spend the money, the choice is between flooded lead-acid and AGM. If you want the convenience of a maintenance-free battery, or if your batteries will need to be mounted in an inaccessible space, go with the AGMs. Otherwise, save the money and go with the less expensive flooded batteries. After all, you’ll probably need to replace them in four to eight years, and by that time, lithium will almost certainly be more affordable.
That opinion is based on the choice I made a couple of years ago: I wanted lithium, but I went with a pair of Trojan T-105 6V golf cart batteries for my RV, and they are performing well and meeting my needs. So, when the time comes to replace them, I expect to upgrade to lithium.
How Many Batteries Do You Need?
Well, that depends on what you intend to run from your battery bank while boondocking. Everyone’s needs are different. There are many online tools to help you determine how much energy you will use each day, and your battery bank should be sized to support that demand for at least 24 hours. If you have the room for more batteries, and your RV has the available weight capacity to carry them safely, then a bigger battery bank is better! A battery bank that can support your needs for 48 hours or more without recharge is an ideal situation.
The sites below are a good place to start your research.
- https://solardesignguide.com/rv-battery-sizing/
- altestore.com/diy-solar-resources/how-to-size-a-deep-cycle-battery-bank/
It’s also possible to start with the number of batteries your RV came with and get out there away from hookups and see how long they last. A battery bank can be built incrementally based on your real-world testing and results. As you gain experience, it’s easy to see what you need to do next.
It’s best to build a battery bank with perfectly matched batteries. Never mix battery technologies, as Flooded, AGM and Lithium all have different charging requirements. If you need to add a battery or two to your bank, use batteries that match your existing batteries as closely as possible. Pay close attention to type, size and capacity ratings. Ideally, it’s best to have all batteries the same age, but that’s a bit less critical, and once you’re sure how many batteries work best for you, wait until it’s time to replace the oldest and spring for a complete set of new, identical batteries.
Working With Batteries
If you want to change from 12V batteries to 6-volt golf cart batteries, you must make an important wiring change. Most rigs that have 2 or more 12-volt batteries have them wired in parallel. When changing to 6V golf cart batteries, you must wire pairs of them in series to produce the needed 12 volts. This is actually simpler than it sounds (see the diagrams below.)
When working with batteries, first mark the cables so you do not forget which one is which when you reconnect. If you are building a bigger battery bank, see below for wiring info. If you have 12V batteries, you can add a single battery to an existing battery bank. With 6V batteries, they must be added in pairs.
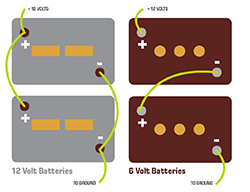
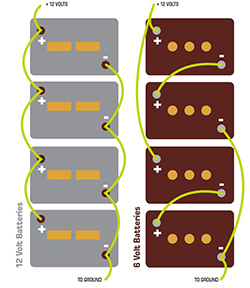
When working on or replacing your batteries, remove the negative cable(s) first because this will minimize the possibility of shorting the battery when you remove the other cables. Next remove the positive cable(s) and then the hold-down brackets, straps or clamps. If the hold down hardware is damaged or corroded, replace it. Dispose of old batteries by exchanging them when you buy your new ones or by taking them to a recycling center. After removing the old battery(s), be sure that the battery tray and cable terminals or connectors are clean. If the terminals or cables are severely corroded, replace them. Keep track of the markings you made on the cables before replacing them!
Thinly coat the terminals and terminal clamps with a high temperature grease or petroleum jelly (Vaseline) to prevent corrosion. Place the replacement battery(s) so that the cables will connect to the correct terminals. Be extra careful here, as reversing the polarity of the battery when connecting it may severely damage or destroy some parts of your RV electrical system. Replace the hold-down brackets or straps to secure the batteries in place, then reconnect the cables in reverse order, i.e., attach the positive cable first and then the negative cable last.
Wrapping Up
If you find that boondocking is having your cake and eating it too, having plenty of battery power is the icing on that cake!
Don’t let the technical aspects of all this scare you! Batteries are easy to understand and work with. You can do it yourself or ask an RV shop or tech to help you add batteries or reconfigure your existing setup and get the power you need to enjoy the boonies. Next time, we’ll talk about monitoring and charging your batteries.
Did you like this post? Pin it to Pinterest!


Author
Mark Nemeth
Mark travels in a small class-C and has made numerous modifications to his RV to enable him to boondock more easily. He’s not saying he’s an expert, or the primary source for boondocking information, but he’s done it for a number of years and is happy to share some things that he’s learned the hard way.


One Response
My wife and I are new to RV’s and wanted to thank you for providing a clear and well-written explanation of RV house battery options. We recently replaced the original 12v house battery that came with our Class-C RV, with two 12v flooded lead-acid deep cycle batteries. We considered LiFePo4 batteries but their high cost convinced us to stay with lead-acid for now.